Showing posts with label laptop. Show all posts

Tuesday, May 28, 2013

HOW TO LOCK DOWN AND SECURE YOUR PC WITH PREDATOR

This post is about an unsual way to use your USB mass storage device as a tool to secure and lock down your computer for restricted access. Here, your USB mass storage serves a the key to unlock and lock down your PC. Once it is inserted into your Pc It automatically unlock your pc and when once removed, it locks down in a couple of micro seconds. Whether you like it or not a good security measure Is something everyone needs to pull by the side when dealing with anything in this life.

To do this little trick, I will be introducing to you a window application called PREDATOR that helps you to do this. Predator is the window application you need if you are the security conscious type. It prevents others from hacking into your system files when you are not available. It's more convenient than closing your Windows session, if you ever have to and does not require you as an authorize user toretype your window password when you return.


KNOW HOW IT WORKS

Now let me come down to how this very little shit works.
  • Like I said earlier Predator helps you to lock down your Pc/laptop when you remove your USB flash (mass storage Device) while your widows session is still running by darkening your window screen and making your PC/laptop key board and mouse to become totally inactive for anyone or any unauthorized user.
  • One wonderful thing about this application is that it also helps as a tracker and keeps activity logs that enables you to know people who made attempt to use your computer.
  • Predator also helps you to set an alarm that keeps away or freak out intruders. Maybe you're are in a public place operating your Device and at the same time you have a "here and there" movement to do within that area, instead of getting so worried about who to look after or watch out for you PC, just relax and and keep your ears alert to hear an alarm when someone touches it and that's all.
  • Predator also disables ALT+CTRL+DEL on your system, this make it very hard and rigorous for for anyone who is up for a fast one to terminate and kill program process through TASK MANAGER in which predators will certainly happen to be among them.
  • Now come to think of if what if your USB mass storage gets missing... Yes it may happen but then you can still access your Pc with a special Password that you must Have created at the time of installing predator on your system. All that I am going to explain later On in this Post

System Requirements for Installing predator

PREDATOR is availble on the following operating systems:
32-bit based systems
Windows 8 (all editions)
Windows 7 (all editions)
Windows Vista (all editions)
Windows Server 2008
Windows Server 2003
Windows XP SP3 (all editions)
64-bit based systems
Windows 8 (all editions) 64-bit
Windows 7 (all editions) 64-bit
Windows Vista (all editions) 64-bit
Windows Server 2008 x64
Windows Server 2003 x64

PREDATOR will not work with other versions of Windows than those indicated. If the Microsoft .NET Framework 4 Client Profile is not installed on your computer, the PREDATOR installation program will do it for you.


Download Predator forWIN 32Bit and WIN64bit

HOw To Install Predator

  1. Download Predator free edition InstallPredator.exe and Install it in your PC.After installing run the application from Windows program menu or the desktop shortcut icon.
  2. You will get a message box like this Insert your USB flash drive and click OK to continue.
  3. Now the preference window will appear. Here you can set the screen darkness,start-up mode,and other options by checking in the check boxes.
  4. In the Change Password field put your new password when you are configuring 1st time. Select the Drive letter in your computer which indicates the USB drive of your computer. Now press “Create Key” button and it will successfully create the key file in your USB flash drive.
  5. Now click OK.
  6. Check in the system tray.If the Predator icon is blinking then everything you have done is OK an ready to lock your PC.

STARTING OFF WITH PREDATOR

To get started with this trick to lock down your PC for security purpose, all you have to do is adhere to all the steps Given below

To start monitoring your PC
Insert your key Run the software via the Start Menu / Programs / Predator item or via the PREDATOR icon on the Desktop Make sure that the PREDATOR icon flashes in the taskbar


When you go away
Look at the PREDATOR icon in the taskbar: if it is red, wait. If it is green and blinking, remove the key.
The desktop will be locked in a few moments, depending on the settings you have chosen. If somebody tries to use your PC, PREDATOR shows the password dialog and starts a countdown.
If an invalid password is entered, PREDATOR sounds an audible alarm and displays a blinking Access Denied sign.

When you're back
Insert the key. The desktop will be unlocked in less than a second. If somebody has tried to use your PC, PREDATOR automatically opens the Log window and shows the failed access attempts

To stop monitoring your PC, temporarily or permanently
Click on "Pause monitoring" or "Exit" from the context menu

To verify or tell if someone tried to used your PC while you were away,
Click on "View log" in the context menu and see all logged activities.


FAQ:


Can I make a copy of my USB drive and give it to someone else to use on my PC ?
No, you can't make a simple copy because PREDATOR has a unique copy-protection scheme: if someone tries to copy a PREDATOR key, the copied key will be useless. If you need several flash drives to protect your computer, you must prepare them with the "Flash Drive" section of the Preferences window. For instance you can make a spare key to unlock your computer in case you lose your main key, or you can give their own keys to some trusted persons to allow them to use your PC. Return to FAQ's main index

What is the minimum size of the USB drive needed to operate PREDATOR ?
Any USB drive size will just be okay do so long as PREDATOR finds a 1KB free space to writes its protection codes and can be found on the USB Drive as "predator.ctl" and is located at the root of the drive.
What if I lose/break my key ?
This may be very risky. Its like locking your room and swallowing the Key Up(.....wondering where u r going to lay ur head to rest for that day). Now if this ever happens, then Run Predator, and wait for the screen to go blank, click anywhere on the screen with the left mouse button, then press the Enter key 3 times to display the password dialog box
Kindly type your password as required to enable you have access once again
Insert a new flash drive (mass storage Device)
Right-click the PREDATOR icon found on the taskbar and click the Preferences item Prepare your key as shown in the paragraph USB Flash Drive in the Settings page. And that's all.
What if I forget my password?
Run PREDATOR as Administrator and click the "Reset Password" button, to reset your password,
After that kindly Click the close button to quit the program

You can click here for more Info about Predator Here!

Friday, May 17, 2013

7 THINGS TO DO IF YOUR PHONE KEEPS RESTARTING

many mobile users have been noted to have complains of phone that keeps restarting. There are several obvious reasons as to why your phone may keep restarting. I have taken some some time to explain some of the common reasons below and instructions you can adhere to fix such bug.

1. UNINSTALL NEW APPLICATION

Many mobile gadget users gets a timeless phone restarting bug the moment they install new applications that are partially or not compatible with their devices.Sometimes times they may erroneously attribute it to having installed a virus infected application. But that may not always be the case. The possible solution is to do away or undo installation to get rid of the installed files. If you are a java phone user, and you have an antivirus installed , then you should completely uninstall it 'cus it is totally needless.

2. DO AWAY WITH OLD SIM

Yes! you may have to do away with that old SIM on your mobile and learn how to make a replacement for that. Do this after you must have tried putting away that old SIM for like days to examine the performance of your phones. If the Old SIM happens to be the reason why your phone keeps restarting, then do a welcome back.

3. FORMATTING YOUR DEVICE

The next resort after the 2 mentioned steps above is to format your Mobile device .Formatting helps to do away with all foreign objects and files that are malicious and harmful to your device. Dial *#7370# on your home screen and next, enter lock code. Don't forget to back up all files and folder and contacts stored in your phone or else you may end up loosing them.

4. SCAN YOUR PHONE WITH ANTIVIRUS

Do a thorough scan of all files and folder on your mobile drives if you have to. You can scan them with your antivirus on PC.

5. KEEP PHONE AWAY FROM EXTREME TEMPERATURE

Exposure to extreme conditions (for instance, exposure to the sun for long hours) can make an electronic device reboot. In addition to that, it is 'unhealthy' for the battery.

6. VISIT A QUALIFIED MOBILE TECHNICIAN

After all these steps above then you can assert is sure is for sure a hardware issue. If everything fails, it is more likely to be a hardware problem. In this case, you have to take your device to a near Nokia Care point. Remember to bring your warranty proof with you.

7. UPGRADE YOUR DEVICE FIRMWARES

Updating your firmware resolves any issues that may be found in current firmware version as well as it keeps your device updated and fixes a lot of bug. Many phones respond positively to firmware upgrade and trust me, it works like Magic. But you should only do this after the above steps must have proved abortive.

HAVE FUN!!!

Wednesday, May 8, 2013

REMOTE YOUR MAC WITH YOUR ADROID DEVICE

At exactly one week ago a go I posted how to remote control and conference your pc with a mobile phone installed with Teamvier application.

Today i thinks this very post is a bit different. or let me say it is the same only that you won't be need a third party programme or software to remote your MAc pc. All you need this time is a Mac Remote app for your Android phone or tablet is just the right tool we're going to use to do the magic.


HOw it Works

Remoting your pc with app on mobile is nothing new and has never been anything more than installing a server side application that helps you to handle commands from a device which serves as a control to a remote computer.

The main thing you have to know here is, your MAC computer works over SSH. As a User, you just need to enable remote logins for your machine, and the app walks them through wizard as a guide.

With this, it enables media playback on your MAC computer using your androidIn a simple way, you will have a remote control in your hand, without needing to install additional programs on your computer.
You will be able to watch movies without getting off the couch!
Get the app Here Now
With this application you will be able to control the followings media players in an individually way
- VLC
- itunes
- Iphoto
- Spotify
- Quicktime
- MplayerX
- Preview
- PowerPoint
-Keynote
Also you will be able to shutdown, suspend and adjust brightness and volume! Everything remotely!

Tuesday, May 7, 2013

ETISALAT MANUAL CONFIGURATION AND MMS SETTINGS

This is just a full review of all the post concerning Etisalat configuration setting. For those that were unable to configure their phone automatically, you can stick to the below options and steps to get it done. The settings below include manual configuration settings and MMS settings for your Etisalat SIM

Etisalat Data Service Settings  for Handsets

Etisalat Internet COnfigurationCode
Account NameEtisalat Ng
Acess Point Name (APN)Etisalat
UsernameLeave it Blank
PasswordLeave it Blank
Home Pagehttp://mobile.etisalat.com.ng
--------------

ETISALAT WAP/GPRS SETTINGS:

Etisalat WAP COnfigurationCode
Account NameEtisalat Ng
Acess Point Name (APN)Etisalat
UsernameLeave it Blank
PasswordLeave it Blank
Port8080
IP Adress10.71.170.5

ETISALAT MMS CONFIGURATION

Etisalat MMS COnfigurationCode
Account NameEtisalat MMS
Acess Point Name (APN)Etisalat
UsernameLeave it Blank
PasswordLeave it Blank
Port8080
MMS Gateway IP Address10.71.170.5
MMS Gateway URL/Homehttp://10.71.170.30:38090/was

ENJOY

Saturday, April 27, 2013

THE EASIEST WAY TO USE YOUR iPHONE AS A 3G MODEM

The use of Iphone to surf the web brings a unique user web browsing experience and is for sure very cool for anyone maximize full use of its internet capability.

Althrough this blog I have taken my time to explain ways to Connect mobile phones with PC so as to access the internet to browse free. Infact one of the foremost reasons why I initiated this blog was to showcase all the experiments I have made in trying to connect mobile devices and PCs to surf the net at a little or no cost price.

For many Iphone users who want to do more than syncing files from their Mobile to PC with their IPhone must have at one point or the other wondered in their wildest imagination how to use it(iPhone) also as a Modem.

Using a phone as a modem is not a new technology to any tech savvy individual. But taking the advantage of the 3G enabled capability found in an Iphone so as to use it as a modem is what makes this post a little bit different.

In connecting your Iphone to your MAC/PC computer as a modem, "Tethering" is the word you should get familiar with.

this means you're able to your connect Iphone directly to your PC with a USB cable or Wireless connectivity which involves the use of bluetooth without any Emulator or third party software ( for example; like the use of NOKIA or SAMSUNG PC SUITE or whatever) the same way you will do with your Zte or Huawei Modem so as to make use of your network's 3G data service.
RELATED POSTS:

STEPS TO USE YOUR IPHONE AS A 3G MODEM

1. Update Your Iphone OS
First, kindly update your Iphone OS. You can check out the post I've created on How to update Iphone OS here

2. Tether Your Internet Connection
Go to iPhone's menu, navigate to settings tap General > Network > Internet Tethering. Slide the Internet Tethering switch to On.
  • 3 Plug in your USB
    To use your iPhone via USB to connect as a modem, first connect your iPhone to your computer. If you're using Microsoft Windows OS, then dash to your computer's Network services settings from Control Panel and choose iPhone. Alternatively, Mac users (must be running Mac OS X 10.5.7 or later), you would see a quick pop-up on your screen with the message "A new network interface has been detected". left click on Network Preferences, then enter configuration settings of your network provider for iPhone, then click on Apply to save settings.

  • Alternatively

    1. Connect wireless via Bluetooth
      Still in the same manner, head over to your iPhone's settings menu, tap General > and switch on Bluetooth connection. But you must first pair and connect the iPhone to your computer.
    2. Browse the Web
      Now you will see that the Bluetooth Icon now carries the message "Internet Tethering" at the top of your iPhone. Now you are good to go 'cus you just succeeded in connecting your iPhone as a Modem.
    3. But Wait !!!

      Not so Fast, Do get a data plan of your choice to surf with and remember not to turn of Internet tethering until you are done with your browsing section on Ensure you have a large data quota to work with, as tethering uses much more data than browsing the Web on your iPhone does. If you regularly use tethering, we suggest a data allowance of at least 1GB per month.

    Friday, April 26, 2013

    HOW TO CHANGE YOUR IP ADDRESS ON GOOGLE CHROME

    Just about a week ago, I posted on this wonderful blog how to change your IP address easily with Firefox Extension.The post got limited views as it was just for Firefox users only. Now this time around I will be showing you how to do the same on Google Chrome Browser.

    To easily change your IP address on Google Chrome with the help of a third party extension, you just have to lay your hands on the official HMA web proxy extension from hidemyass.com.

    This Web Proxy extension makes it very easy to switch to a secure and anonymous browsing mode at will. It also redirects your web traffic through anonymous network. Hide my Ass! extension for chrome browser is by far the most widely used browser based webproxy today. New IPs are generated for use on daily bases from different countries.

    What makes Hide My ass proxy unique is that it works well on youtube website unlike other web base proxy extensions.
    You may want to ask How does this chrome extension browser based webproxy guarantees complete anonymity?. or

    RELATED POST: CHANGE YOUR IP ADDRESS WITH FIRE FOX EXTENSION

    Why Must I use this browser web proxy?

    Okay now!
    • 1. Hide my ass extension for chrome browsers completely conceals your web browsing history for complete anonimity
    • 2. It hides and change your IP address location which is used as your online fingerprint.
    • 3. Connections through SSL is encrypted for all the sites you take visit,
    • 4. Bypass web filters and shield you from geographic internet blocks associated with your IP address.

    click here to Download Now

    If what i just explained above makes it okay for you, then here is how to go about the use of this Extension on your chrome browser

    HOW TO USE HMA BROWSER BASE WEB PROXY EXTENSION
    1. One click proxy. Whilst already browsing a website, click the extension icon to browse the website anonymously. Alternatively click the icon on a new tab to be shown a web proxy form and specify a website to proxify.
    2. Select one of 20 web proxy domain names (not just HideMyAss.com).
    3. Select a specific web proxy server (USA, UK, NL).
    4. URL obfuscation. Choose between encoded and encrypted web proxy URL's.
    5. SSL encryption. guarantees you to make your choice between HTTP and HTTPS connections when browsing.
    6. Available Option to always launch web proxy in incognito mode for high level of anonymity.
    7. Option to always launch the web proxy in a new tab.
    8. The Choice to always request for manual URL entry (and not redirect based on address bar entries).
    9. Right click > proxy function.

      1. Thanks for linking to this page. If you want to know how to do the same on firefox, then click here

    Thursday, April 25, 2013

    GLO HSI ROUTER AN ALTERNATIVE TO MTN HYNET

    HSI Router

    Glo HSI Router is an alternative to MTN Wi-Fi HYNET. For most people who don't find MTN HYNET as a choice can find GLO HSI Router as a very a worthy replacement or alternative. GlO hsi router is fast enough with an incredible 3G speed of about 3.7Mbps that make it possible for you to connect directly to the internet with your PC, laptops, mobile gadgets and Tablets and stands reliable...

    It is even more easier to share your connections with Glo Wifi HSI Router among multiple users. That means you're able to network different Wi-Fi enabled gadget to connect to each other like a mini Cafe conveniently. This makes it an ideal choice for any small buisness or coporate body to use with flexible data plans available

    Why I recommend GLo HSI Router

    • Like I said earlier, it is more easier to share connections
    • Comes along with flexible Data Plans to choose from
    • Finally, It is guaranteed that you get value for money
    Cost

    The HSI ROUTER costs just N30,000 and you get along with you a 1 month’s free rental of N15,000**** yes! you heard me right N15,000 1 month Free Rental (but is Limited)


    Requirements to use the HSI Router

    The following are required to use the HSI Router:

    1. A registered GlO SIM card to enable you connect the Router to the GlO HSI 3G network.
    2. Ethernet or Wi-Fi enabled desktop computer or laptop with with the following requirements:
      - Operating System: Windows 2000, Windows XP, Windows Vista or Windows 7 and Mac OS
      - Interface: standard USB interface - Any Internet Browser available: Internet Explorer 8.0, Firefox 20.0, Safari 3.0

    Laptop PC/Mac Configuration Requirements

    The recommended PC configurations for using the router are as follows:
    CPU: Pentium 500 MHz or above
    Memory: 128 MB RAM or above
    Hard disk: 100 MB or above, available space
    Operating System: Windows 2000, Windows XP, Windows Vista or Windows 7 and Mac OS Screen Resolution: 800 x 600 pixel or above, 1024 X 768 pixel (recommended) Interface: standard USB interface

    Activation

    type http://192.168.1.1 on your browser to start off internet connection.

    Log in as "Admin", your default password should be "admin".

    Subscription

    • 1 Select Self Care
    • 2 Left Click on ‘check account balance’ to see an invoice of your subscribed data plan
    • 3 click ‘recharge’. to load recharge pin to desired amount
    • 4 Make your choice of a desired GLO HSI router package .
    • 04 You can start surfing as soon you receive an acknowledgment SMS which tells you your subscription is now active. Acknowledgment SMS could be instant or less than 2hrs. You can also check your account balance to see if it has been debited upon request if you don't get an alert.


    • HSI Router Plans

      Plan Name Servive Rental (N) Data Cap Validity Period SMS USSD
      Silver 10,000 13GB 30 days 15 *127*11#
      Gold 15,000 20GB 30 days 16 *127*12#
      Platinum 18,000 30GB 30 days 17 *127*13#


      As a subscriber, you have the freedom to do a multiple recharge. More than one subscription can be loaded on an account, with the data quota and the plan validity added. it is also allowed for a subscriber to load a maximum of 6 subscriptions at a point in time.

    Wednesday, April 24, 2013

    HOW TO RUN ANDROID GAMES AND APP ON DESKTOP

    MUST READ: How To Install Android Apps & Games On your Computer

    Actually for some time now I've been wondering how I could install andriod apps on my Computer or probably make use of adroid apps with my andriod connected to my pc. All I wanted was to make use of these apps dirrectly on my PC just like I would do to java application using micro Emulator Or Jar Emulator to display apps on my PC or even install them on PC.

    My luck got even harder since all andriods make use of ".apk" file which you cannot use Jar emulator to display them on pc. My Search went no further as I was able to do this in no time.

    Now draw closer let me whisper to your ears how you can easily install and try almost all android apps and games on your Computer without any heck using an application called BlueStacks.

    The secret is, alot of adroid app developers use BlueStack for android app testing on PC. That is to say they use BlueStacks as a platform to test run and display android app so avoid any error that can result from developing app for users.

    BlueStacks is a windows/MAC application that enables you to install and test andriod app ( .apk files) on your Desktop via mobile.

    You can even use it (BlueStack) to snyc files and open chrome browser on your android to browse too if you are subscribed to a data plan see How

    BlueStacks for windows user click here 8MB .exe file.
    BlueStack for MAC users Click here 116MB .dmg file
    BlueStacks for windows 8 users click HereSize:8.86MB

    1. Download and install and run the Bluestacks app like you would do normally to any windows or MAC program

    2.If you are running Bluestack for the first time it will demand for some infos like prefered language and other bla bla bla.
    3. Waste no time to enter your Goolgeplay ID or the current number in which you use on your android phone.
    4. The app should automatically sinc and open the apps from your android mobile phone .


    Now you are good to go. Just take your time to enjoy installing any android Game or App of your choice on PC.


    You can click the like button if you find this post helpful.

    Thanks!

    Monday, April 22, 2013

    MTN NEW DATA PLAN GET 160% EXTRA WITH EXTENDED VALIDITY

    Good News to all MTN Nigeria subscribers, MTN NG has introduced new and flexible mobile internet data plans at a very affordable rate. MTN now gives its subscriber 25MB for just N150 and also 50MB for N200. That means you get 50% Extra of the normal data rate. Simply dial *112# and *113# .

    You also get up to 260MB when you activate 100MB which is 160% extra data.

    That's not all, you can now extend unused data remaining from last month to the next. With this your data plan never gets wasted. I know every one will smile to this

    So start activating now for a superb experience


    You can also check out the below table to Get the Full Details.


    Bundle Plan

    Price (N)
    Total Data Allowance
    Validity Period
    Activation Code (Text to 131)
    Activation Code (Dial)

    DAILY
    10MB

    100

    10MB

    24 Hrs

    104

    *104#

    25MB

    150

    25MB

    24 Hrs

    112

    *112#

    50MB

    200

    50MB

    24 Hrs

    113

    *113#

    150MB

    500

    150MB

    24 Hrs

    103

    *103#


    WEEKLY

    25MB

    400

    25MB

    7 Days

    105

    *105#


    MONTHLY

    100MB

    1000

    260MB

    30 Days

    106

    *106#

    250MB

    1300

    325MB

    30 Days

    109

    *109#

    500MB

    2000

    750MB

    30 Days

    110

    *110#

    1GB

    3500

    1.5GB

    30 Days

    111

    *111#

    5GB

    8000

    7.5GB

    30 Days

    101

    *101#

    Please Have it in mind that extension of data plan only applies to those who subscribe monthly plans only


    WIFI DRIVER SOLUTION FOR HP PAVILION

    Intel Wireless Drivers, Intel PROSet, and Intel My WiFi for Microsoft Windows 7

    Description

    The below package for wifi conection solution contains Intel Wireless Drivers and Intel PROSet (Intel PROSet includes Intel "My WiFi" functionality) for the Intel Wireless LAN Adapters.


    Your System requirements, Supported Devices and Features

    Use the below instructions to bring back wireless conectivity to your Hp Computer Intel PRO/Wireless 3945 Network Connection Intel Wireless WiFi Link 4965 Intel WiFi Link 5300 Intel WiFi Link 5100 Intel Centrino Advanced-N 6200 Intel Centrino Ultimate-N 6300 Intel WiFi Link 1000 Intel Centrino Advanced-N 6250 Intel Centrino Ultimate-N 6350

    You can type "msinfo32" (type without quote) on your system to see more details about your computer

    Operating Systems supported
    Microsoft Windows 7 Enterprise 32 Edition
    Microsoft Windows 7 Home Basic 32 Edition
    Microsoft Windows 7 Home Premium 32 Edition
    Microsoft Windows 7 Professional 32 Edition
    Microsoft Windows 7 Starter 32 Edition
    Microsoft Windows 7 Ultimate 32 Edition
    Microsoft Windows 7 Enterprise 64 Edition
    Microsoft Windows 7 Home Basic 64 Edition
    Microsoft Windows 7 Home Premium 64 Edition
    Microsoft Windows 7 Professional 64 Edition
    Microsoft Windows 7 Ultimate 64 Edition

    Click here to Download Driver

    Release details Released:2010-11-25
    File name: sp51121.exe [1/1, 131.34M]
    Version: 13.4
    Compatibility:
    Microsoft Windows 7 (32-bit)
    Microsoft Windows 7 (64-bit)
    Installation Instructions
        1. Click the "Download" to start prompt download and save the file to any folder on your hard drive (or you can create a new folder where the downloaded file would be saved).
        2. Double-click the downloaded file and follow the or wizard on-screen instructions.
      THanks!

      Wednesday, April 10, 2013

      TOUBLESHOOT INTERNET CONNECTION ON WHATSAPP

      Reasons Your Iphone May fail to Connect To The Internet

      In some occasion, you may encounter rare cases and issues sending or receiving messages, photos, or videos, and unable to connect to the internet. This may probably be as a result of your phone's internet connection, or a problem with your wireless carrier or Internet service provider.

      Most connections issues can be resolved by adhereing to the following:

      Basic troubleshooting

      • Confirm you are using the right configuration settings with the right mobile Operator Sim or you're subscribed to a data plan of your choice
      • Restart your iPhone
        • Hold the On/Off button until "slide to power off" appears. Slide to power off your device. When it is off, press the On/Off button to turn it back on
          In iPhone Settings, Turn Airplane Mode ON then OFF
        • In iPhone Settings > General > Reset > tap [Reset Network Settings] (This will delete all your saved Wi-Fi passwords)
        • Upgrade or restore your iPhone's iOS to the latest version for your device. See this article for instructions. 

        If you use an unlocked iPhone or a pre-paid SIM card, then you may need to adjust your phone's APN settings for your SIM card. Please you can make use of this blog's search bar and search this blog for previous posts I have rendered on this.

        If your school or the corporate organisation where you work has Wi-Fi that has firewall restrictions in place, then you should contact your network administrator for help with accessing the internet Wi-Fi network.

        Cheers!!!,

      HOW TO CHAT USING WHATSAPP ON YOUR DESKTOP COMPUTER

      Yes this one is no joke.You can really download and chat live on whatsapp using your PC and laptop. Everyone knows whatsapp to be an interesting mobile chat platform and covers a wide range of users across the globe. This app competes fairly with most mobile chatting softwares like blackberry messenger (BBM), 2go, Ebuddy, mobile yahoomessenger, gtalk, facebook, and a host of others and known to be only available for mobile phone users. This PC version does not need a mobile emulator or Jar emulator to execute itself. its a complete ".exe" file which is functional like the mobile version and can be readily installed on your computer. With whatsapp PC version chatting(messaging), photo sharing,texting and video sharing is as easy as never before

      Whatsapp is available for free download on windows 7, windows XP, windows Vista e.t.c

      Related Post: How to gain unlimited acess on whatapp with Just 100 on Airtel

      Features of The New Whatsapp PC Version

        * It has the ability to include videos, images and memos when sending message across the mobile devices.
        * Your families and friends can also be added on one Chat add.
        * The smileys are also one of the options available which are funny and are also available for the computers. On the computer there are the standard smileys with even the extra smileys.

      Note: When the WhatsApp is used on the computer, then different numbers should be used for the PC and the mobile phone otherwise the this application on the mobile gets disabled.


      More Tips and trick on Whatssap to come up soon!

      See dowload link for whatsapp PC version below

      WhatsApp for PC Save file and run installation like normal PC program

      Whatsapp Download link For your Windows Phone:

      WhatsApp for Windows Phone

      Whatsapp dowload link For Nokia S4o

      WhatsApp for Nokia S40

      whatsaap For your Nokia Symbian:

      Download link for WhatsApp on NokiaSymbian

      For Blackberry:

      Download WhatsApp for BlackBerry

      For Android Phones:

      Download WhatsApp for Android

      To download it for iPhone you will have to install iTune . It is free of charge:

      iTune 10 Download Free

      Now you can download WhatsApp for iPhone. For this click:

      Download WhatsApp for iPhone

      Saturday, March 23, 2013

      HOW TO BACK UP CONTACTS FROM IPHONE TO ANDROID

      Hi
      Do really want to switch from an iPhone to an Android, and you're somehow afraid of loosing those important contacts on your phone.
      Switching from an Iphone to Android is not only about changing the brand name but also involve an entire change in the operating system which may be stressful when trying to sync datas between the both and may also result in incompatibility of file format .

      This tutorial makes it easy for you to transfer your private datas such as Contacts, Mail and Messages, and drafted notes using the Google without installing any app to help you do this. Contact method.

      All you need first is a transfer of your current contacts from your iPhone to Google contacts, This will serve as a back up for all your contacts which will be later restored through the given steps below

      This can be achieved in two different ways, one with
      iTunes and the other with the
      iCloud.

      Steps to Sync Contacts

      Using iTunes to sync contacts to andriod

      First you must have a Google account (gmail account) and secondly, do a manual backup of your iPhone to your computer using Itunes.
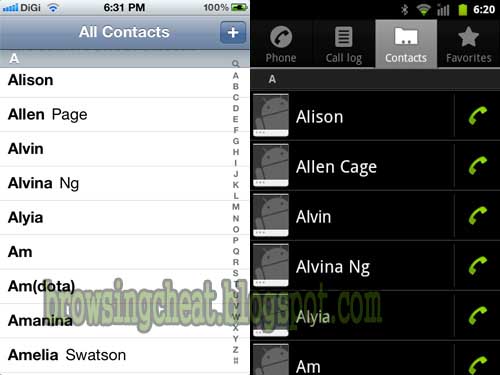
      You can check out the photo below to learn more

      First, open iTunes program on your computer. Click here to download Itunes latest version
      Connect your your iPhone device to your computer via USB.

        Select your iPhone in iTunes. Find the ‘Info’ tab and select Sync Contacts with Google Contacts

        After that, you will promted to enter your Gmail email address and password. Just chill and Wait as all contacts gets synced. Once syncing is successfully achieved, you can check out the outcome by directly heading over to your Gmail account via your device browser and quickly log on to your account. Go to Gmail > > Contacts.

        You’ll discover that all your iphone contacts just got imported to your Google account Contacts.


      Alternative method


      Using iCloud.com to sync contacts to Android

      To use this method, you must have had your important datas backed up on your iPhone to iCloud.com

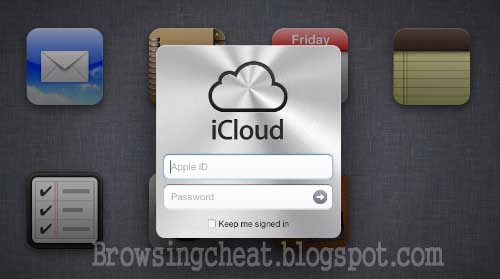
      login to your iCloud account as shown in the image below.

      click on Contacts and you will see all of your backed up iPhone contacts in iCloud.

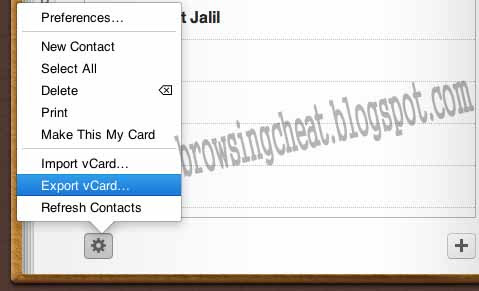
      Hold downCtrl + A (Windows User) or Command + A (MAC users) to select all of your imported contacts, click on the Settings at the bottom left, then select "Export vCard…".

      Login to your Gmail and go to Gmail > >Contacts.

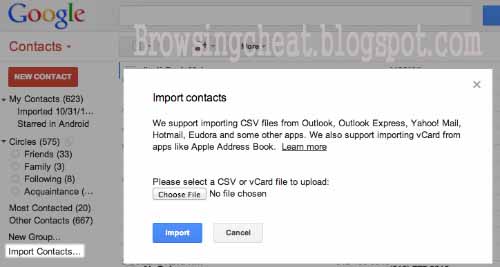
      After that, click on ‘Import Contacts…’ and an alert will be prompted. select your exported vCard… file and click Import to import all iPhone contacts to Google Contacts.

      2. Merge Duplicate Google Contacts

      Once you’ve imported iPhone contacts to Google Contacts, you can get rid of duplicate contacts before restoring your contacts on your phone to avoid repeatation of contacts. You may choose to do this on on your computer than on your smartphone.

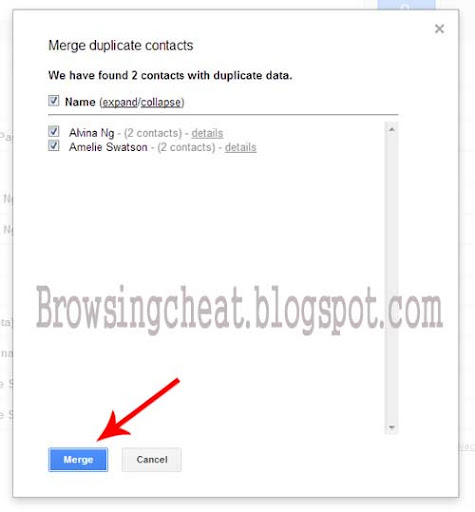
      Click on More and then click on Find & merge duplicates...

      A page with the names of duplicated contacts will pop up. After going through the names, select those that have duplicate contacts and Merge them.

      3. Steps in Restoring Backed up Contacts on your Android device

      After a succesfully exported and merged duplicates of your iPhone contacts to Google Contacts, you can start the process of restoring it to your Android phone.

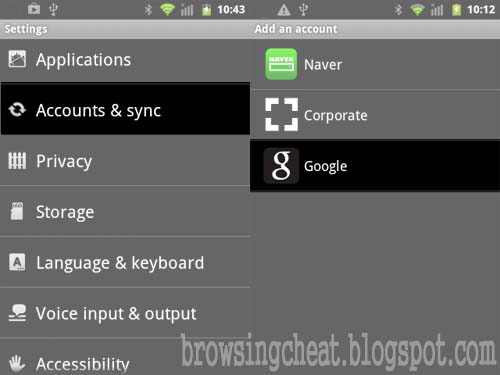
      Go to Menu > Settings > Accounts and Sync. on your Android phone. Tap on Add Account and select Google.

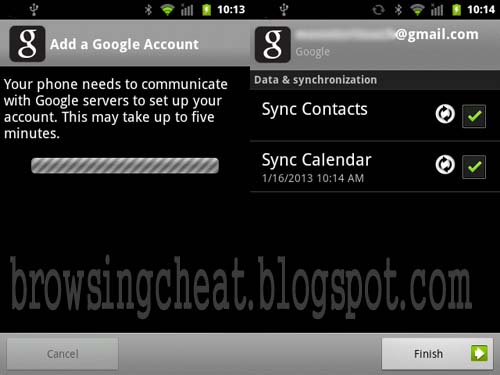
      Then, click on Sign in and key in the Gmail account you used to sync your contacts to.

      You can some seconds to Wait for communications to the Google account Servers to be fully established. This will land you a page where you’ll given options on what you want to sync into your phone. Tick ‘Sync Contacts’ and tap on Finish.to finally complete the action

      With that, Hurray you’re done! You can verify that by simply checking your Android phonebook.

      One great thing about using Google Contacts to sync your contacts is that even if you lose your phone or switch to another smartphone, you will never lose your contacts. They are kept save within your Google account.

      You can drop off any comment concerning this guide below via the comment box. Thanks!

      Saturday, March 9, 2013

      UNLOCK THAT STUBBORN ZTE AND HUAWEI MODEM HERE

      follow this guide line to unlock your Huawei Modem Easily

      I know you must have been frustrated after several attempts to unlock your new Huawei modem probably because generating the unlock code using IMEI doesn’t seem to work for you like it used to. Well, the newer versions of Huawei modems like E303 and E173 doesn’t seem to respond to that old trick any more. It also doesn’t show you where to put the unlock code for your E173 modem when you insert SIM from other network provider. I also had the same experience and made several attempts too, but all to no avail. Suddenly, I had a brain wave and decided to try the popular DC-unlocker .And guess what? Voila!!! it finally got unlocked.

      You can Download the latest version here. Follow this easy tutorial on how to unlock stubborn Huawei and Zte to enjoy a wonderful browsing experience with any network of your choice.

      This tutorial will help you unlock the following model of modem: ZTE MF190(Telma Madagascar), ZTE MF633, Huawei E177 (Zain Sudan,Huawei E153 (MTN Sudan),Huawei E173 (Safaricom Kenya), Huawei E303 (Sudani Sudan), Huawei E173 (Airtel Nigeria), Huawei E3231 HiLink, Huawei SoftBank 005HW, Huawei SoftBank AP01HW,Huwei E1750, Huawei E153u1 (Etisalat Egypt), Huawei E153 (Philippines SmartBro), ZTE MF627 (Philippines)

      The first you should know is that you need some amount of credit on your DC- unlocker to unlock your device. Don’t be carried away by that crappy stuff regarded as a cracked version of DC-unlocker. You must buy sufficient credit before you can unlock any stubborn modem. The credit varies depending on the device you want to unlock. You can check out the price list from this linkFor Huawei E303, it’s only 4 credits while E173 requires 7 credits.

      Related Post:

      Step 1:

      Now, let me assume you just got some sufficient credit to your account. Click here - Connect your modem and run the software. Be sure you close the default dashboard software for your modem.
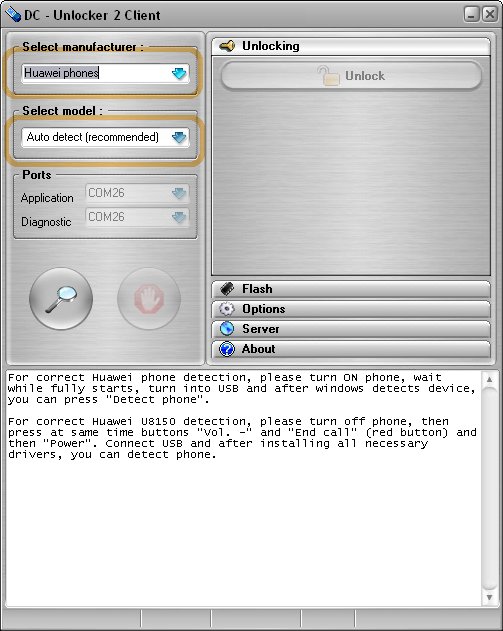
        - Quickly Select your device manufacturer (e.g Huawei or Zte) from the drop-down menu and find your device model from the ‘select model’ section
        - Or you can click on the magnifying glass icon to enable the DC-unlocker software to automatically search and detect your device.
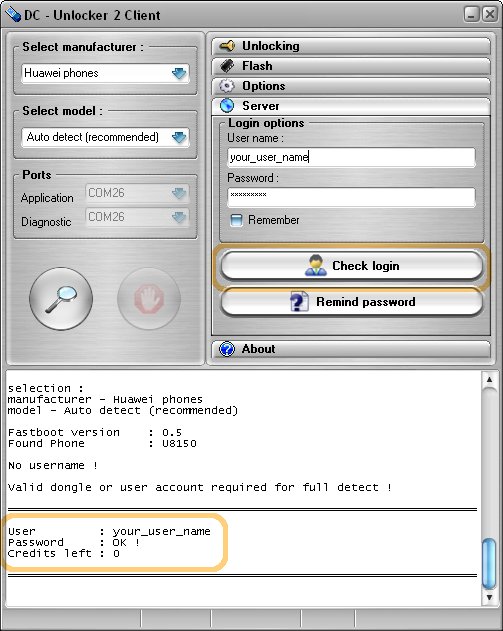
        - It normally takes few second for the software to detect your modem automatically. See the photo below to learn more
      Step 2:Now switch over to the right pane of the unlocker and click on Server and fill out the “login options” text box. Fill it with your username and password, click on check login. Dc-unlocker user name and password is created upon purchase of sufficient credit. You can do that with your PayPal account or via credit card

      Step3:
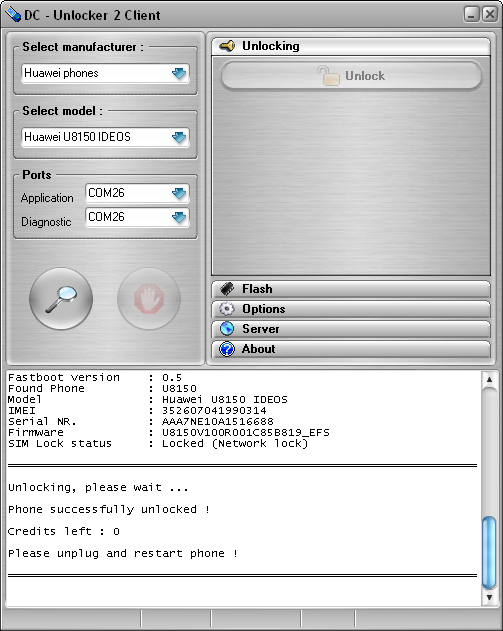
      Hit the “Do job” button and enjoy unrestricted SIM usage on your Zte and Huawei modem You can check out the photo below to see a proof that your stubborn Huawei modem has been unlocked successfully (It works for Zte also)
      Note: You much have a sufficient balance or credit before you can successfully unlock your modem You can just drop a ‘thank you’ comment, after unlocking your modem with these 3 easy steps above. You can check this link to see list of D-unlocker distributors in your country or near your locality.For those of you who don’t have a PayPal account, you can contact me (toneroadah4real @yahoo.com) and I will carry out the purchase for you, else you can drop your testimony via comment box below

      Wednesday, March 6, 2013

      SIMPLE STEPS TO USE YOUR BLACKBERRY AS MODEM

      Using your Blackberry smart phone As A Modem
      Please do your self a favour by adhering strictly to this steps on how to browse with your PC using your Blackberry as a Modem or you might end up loosing bunch of hairs trying to achieve a successful connection
    1. Get your modem and have it subscribed to any data plan of your choice
    2. Download Blackberry Desktop software. BlackBerry® Desktop Software for PC coordinates the link between your smartphone, tablet, email accounts, calendars and more. you can download the latest version of BlackBerry Desktop Software 7.1 here. it is available for both Mac and Pc Users.
    3. After downloading it, you can install it on your using the step by step installation wizard
    4. Go to the menu, and click on tools >> Mobile internet settings
    5. Next,You shall see Profile Drop-down menu. Click on the Add Custom Profile to configure with any Network settings or configuration. If you check properly, you will dicover that No Nigerian mobile network Operator is listed in it. so you will have to do that yourself by adding a custom profile

    6. Settings for Mtn Users
    7. MTN NG
    8. profile name and username: web
    9. password: web
    10. access point: Web.gprs.mtnnigeria.net

    11. Now Go back to the Menu.
      After menu>> click on Tools and >>click on Start Mobile Internet.
    12. Click on Connect
    13. Finally, you have Successfully Connected yourself to the Internet. You can now nod your head and start browsing,
      Note after following all these steps, dont close the blackberry Desktop Software until you are finnally through with your browsing

      GLO BIS (BLACKBERRY INTERNET SERVICE) ON PC IS BACK

      Who says Glo BIS cheat on Pc is no longer working. Well, the good news is that you now have that internet connection freedom and access to browse and download without a limit with your Glo BIS (Blackberry Internet Subscription) with the new below settings. This implies that you have full internet connection without data plan restriction allotted to your subscription on your device Pc, Computer, Laptop, ipad, Andriod.

      Just adhere to the following simple steps on how to Use Glo BIS Plan to restore connection


      first of all just insert and connect your modem. click here to see steps on how to install your glo modem on pc
      Enter the following properly to configure your modem for the new glo cheat. APN: blackberry. net IP: you can leave it blank PORT: Leave it blank USERNAME:Leave it blank PASSWORD: Leave it Blank.
      How to subscribe glo BIS (blackberry Internet Subscription) data plan
      Glo Monthly BIS Subscription Code:
        1. For Glo monthly BIS, just send COMONTH to 777 (3GB)
      Cost Just N1,500 NAIRA. instead of the N,4000

      You can Enter your Mobile Number Here to get Instant GLO Settings to your Mobile Phone.
      You can share it with your friends on BBM, twitter and Facebook by just clicking the share button on this page.

      Friday, February 22, 2013

      GOOGLE UNVEILS HER FIRST TOUCHSCREEN LAPTOP

      Google has unveiled its first touchscreen-enabled laptop.
      The Chromebook Pixel runs Google's Chrome operating system and has been "largely built" by the web giant. The laptop has Intel's Ivy Bridge processors, fast 4G LTE connectivity and a high-resolution screen aimed at challenging Apple's Retina Display. Analysts say the move represents a fresh bid to build market share for Chromebooks against machines running Microsoft and Apple operating systems. Unlike PCs that use installed software such as Microsoft Word, Chrome OS computers run their applications through the firm's web browser and store their files in the cloud. The internet giant told the BBC the device was "largely built by Google, with components that are manufactured globally". The laptop's 12.85in (32.64cm) display's resolution is similar to the so-called Retina Display of Apple's MacBook range, aimed to have pixel density high enough for the human eye not to notice pixelation when looking at the screen at a typical viewing distance. "This Chromebook has the highest pixel density (239 pixels per inch) of any laptop screen on the market today," said the company. "Packed with 4.3 million pixels, the display offers sharp text, vivid colours and extra-wide viewing angles

      Friday, January 27, 2012

      Change Laptop Lid Setting

      I know it's to Small or Beginner subject, but many ppl ask me there laptops automatically move into sleep mode when they close the lid, Its really nice power saver option but some time we might want to leave laptop running becasue of some download or data moving.

      Here is the way to change laptop Lid setting ...

      Windows 7
      1 ) Left Click battery icon in your system tray
      (system tray area is right side area of your taskbar, icon near your clock)
      2 ) Small bettery Infomation window will open
      3 ) Click on "More Power Options", It will open "Power Options" window
      (you can open power window from control panel also)
      4 ) Click "Choose what closing the lid does" on the left sidebar
      5 ) "Define power buttons and turn on password protection" option will open
      6 ) Select wht you want to do while you close shut you laptop lid, by seleting drop down list box next to "When I close the lid:"
      (you will get Do nothing, Sleep, Hibernate, and Shut down as option)
      7 ) Click "Save Chanes", close "Power Option" window
      On "Define power buttons and turn on password protection"(after stap5), you can edit setting for yout laptop "Power button" and "Sleep Button" and you can set password protection setting, that ask you for password when its wakes from sleep mode by clicking "Change settings that are currently unavailable" under "Password protection on wakeup"

      Windows XP
      1 ) Open "Start" Menu
      2 ) Select "Control Panel" form "Start" Menu
      3 ) Click on "Switch to Classic View" on left sidebar
      (If your control panel is already on classic view, ignore stap3)
      4 ) Click on "Power Option" icon, "Power Option" window will open
      5 ) Select "Advanced" tab
      6 ) Select option from drop down list box for closing the lid option under 'When I close the lid of my portable computer'
      (you will get Do nothing, Stand by and Hibernate as option)
      7 ) Click "Apply" and "Ok"
      On "Advanced" tab (after stap5) you can edit power button setting to, by select option for "When I press the power button on my computer"

      Note : Do Not put laptop in bag or any soft thing like pillow while its running, its sure get overheat,it may be damage your laptop.

      Blog Copyright 2011-2012 Rushi Pandya(INDIA)
      http://pandyarushi.blogspot.com/