Showing posts with label hack. Show all posts

Monday, June 17, 2013

HOW TO KNOW THE SENDER'S LOCATION OF THE EMAILS YOU GET


On daily bases, millions of spam messages are being sent over the internet so much so that it could be possible one just entered your inbox while reading this post. The Next thing that comes to mind is knowing "who is actually the sender". Sometimes these emails are being sent anonymously over the web while others are sent through the senders original IP address. The mails you receive as spam sometimes does not fully decipher the sender but actually carries few information on who the Sender really is or the IP address of the sender.

How to Find Sender's IP address in Hotmail
1. Log into your Hotmail account with your username and password.
2. Click on the Mail tab on the top.
3. Open the mail.
4. If you do not see the headers above the mail message, your headers are not displayed. To display the headers,
* Click on Options on the top-right corner
* In the Mail Options page, click on Mail Display Settings
* In Message Headers, make sure Advanced option is checked
* Click on Ok button
* Go back to the mails and open that mail.


5. If you find a header with X-Originating-IP: followed by an IP address, that's the sender's IP address Hotmail headers : name ,In this case the IP address of the sender is [68.34.60.59]. Jump to step 9. 6. If you find a header with Received: from followed by a Gmail proxy like thisHotmail headers : nameLook for Received: from followed by IP address within square brackets[].In this case, the IP address of the sender is [69.140.7.58]. Jump to step 9. 7. Or else if you have headers like thisHotmail headers : nameLook for Received: from followed by IP address within square brackets[].In this case, the IP address of the sender is [61.83.145.129] (Spam mail). Jump to step 9. 8. * If you have multiple Received: from headers, eliminate the ones that have proxy.anyknownserver.com.9. Track the IP address of the sender

HOW TO FIND THE SENDERS THROUGH IP ADDRESS IN MESSAGE HEADER IN GMAIL


How to find the IP address of the sender in Gmail: When you receive an email, you receive more than just the message. The email comes with headers that carry important information that can tell where the email was sent from and possibly who sent it. For that, you would need to find the IP address of the sender. The tutorial below can help you find the IP address of the sender. Note that this will not work if the sender uses anonymous proxy servers.

Finding IP address in Gmail:
1.Log into your Gmail account with your email address and password.
2. Go to your inbox and open a mail.
3. To show the email headers, Click on More options on that mail thread. You should get a massive bunch of links displayed. Click on Show original.

4. Next you would get headers like this:Gmail headers : nameLook for Received: from followed by a few hostnames and an IP address between square brackets. In this case, it is65.119.112.245.That should be the IP address of the sender!
5. Track the IP address of the sender. by going to site like whatismyipaddress.com

You May also Like:
  • HOW TO CHANGE YOUR IP ADDRESS ON FIREFOX
  • HOW TO CHANGE YOUR IP ADDRESS ON GOOGLE CHROME WITHOUT ANY SOFTWARE
  • Saturday, June 8, 2013

    IF YOU HAVE AN EMAIL ADDRESS THEN READ THIS

    INTRODUCTION

    If you have an email address and you really want those spam messages to stay clear off your inbox, then you have to read this. Almost like everyday, most internet users gets chunks of spam messages being delivered into their inbox without their consent. And they are left with the question "how did this [***SPAMMER***] get my email address ?". How the sender got your email may not be issue but how often you keep exposing your email address and he/she keeps sending you that annoying crap or story line always. But sometime it is more easier to blame it on yourself due to carelessness on our own part ( I mean no offense). By doing so, you leave SPAM BOTS and spammers who uses Email Extractors to have quick access to your Email address.

    That's why I don't buy the Idea of you Leaving your e-mail address on my blog (...you will be doing so at your own risk). Instead I see no wrong making use of the comment box below if ever you want to be heard or pass across any information for users and visitors of this blog.
    If you really want to stop receiving those Spam messages (unwanted messages), then you must harken to the rest instructions and steps listed below in this post

    To stop receiving spam Emails on Yahoo! Mail. Log on to Yahoo! Mail on your DESKTOPand place search out the spam email. (likely to be in your spam folder)

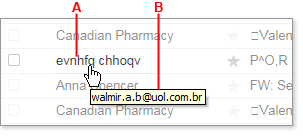
    Place the cursor over the sender's name in your mail folder. The real email address should appear in a tool tip.

    From the Image below, you can see, the labellings A and B


    A. carries the sender's name while B. tells you the real email address of the sender. ( Take Note)

    Wait a minute I think I should make something clear here before we continue You may still get the same type of spam messages timelessly even if you end up blocking the sender with the below steps. Some spammers are very crafty and uses different names with the same domain, such as xpangoxc.a.b@vbi.com.hk and mssoretk.c.b@vbi.com.hk.
    In this case, you are to block the domain and not a specific email address or even the both. For instance, from the illustration above, you're to block the uol.com.br. domain name. If you must also know, on the other hand some spammers are not predictable in how they create their addresses, as such my suggestion concerning blocking the both may not guarantee you to stop receiving spam messages completely. although it might reduce the messages from Spammers.

    Click the gear icon (Gear Icon) in the upper-right corner of the window, and select Mail Options from the menu that appears. (In Mail Classic, select Options | Mail Options.)
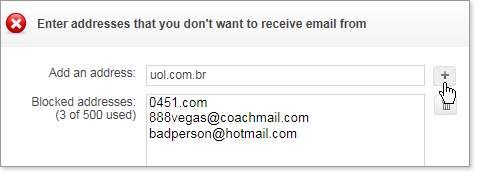
    On the left pane of the Options page, click Blocked Addresses (in Mail Classic, click Spam). In the Add an address box (in Mail Classic, Add a Blocked address), type the email address or domain of the Spammer that you want to block forever.
    Click the "+" button to the right of the box (in Mail Classic, click Add).

    Block address

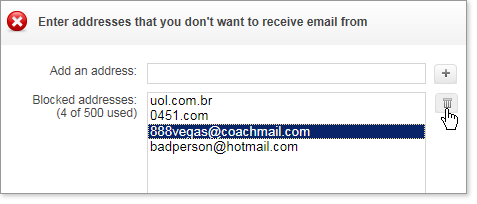
    The address or domain is added to your list of blocked addresses, and you should no longer receive email from that address. You can use this method to block up to 500 email addresses and domains from different senders. You are also able to see how many you've blocked on the left side of the list, for example, "3 of 500 used." Please note that in cases where the spammer uses a Yahoo Id, Only the Email address should be blocked Not the Domain Name. Blocking the domain can stop you from receiving emails from other Users with yahoo ID

    To Ublock Address


    To Unlock any Email address, Simply select the email address you want to remove from the list and click the Trash Can Icon as shown above, to remove the address from your block List.

    THATZ ALL

    Saturday, April 27, 2013

    THE EASIEST WAY TO USE YOUR iPHONE AS A 3G MODEM

    The use of Iphone to surf the web brings a unique user web browsing experience and is for sure very cool for anyone maximize full use of its internet capability.

    Althrough this blog I have taken my time to explain ways to Connect mobile phones with PC so as to access the internet to browse free. Infact one of the foremost reasons why I initiated this blog was to showcase all the experiments I have made in trying to connect mobile devices and PCs to surf the net at a little or no cost price.

    For many Iphone users who want to do more than syncing files from their Mobile to PC with their IPhone must have at one point or the other wondered in their wildest imagination how to use it(iPhone) also as a Modem.

    Using a phone as a modem is not a new technology to any tech savvy individual. But taking the advantage of the 3G enabled capability found in an Iphone so as to use it as a modem is what makes this post a little bit different.

    In connecting your Iphone to your MAC/PC computer as a modem, "Tethering" is the word you should get familiar with.

    this means you're able to your connect Iphone directly to your PC with a USB cable or Wireless connectivity which involves the use of bluetooth without any Emulator or third party software ( for example; like the use of NOKIA or SAMSUNG PC SUITE or whatever) the same way you will do with your Zte or Huawei Modem so as to make use of your network's 3G data service.
    RELATED POSTS:

    STEPS TO USE YOUR IPHONE AS A 3G MODEM

    1. Update Your Iphone OS
    First, kindly update your Iphone OS. You can check out the post I've created on How to update Iphone OS here

    2. Tether Your Internet Connection
    Go to iPhone's menu, navigate to settings tap General > Network > Internet Tethering. Slide the Internet Tethering switch to On.
  • 3 Plug in your USB
    To use your iPhone via USB to connect as a modem, first connect your iPhone to your computer. If you're using Microsoft Windows OS, then dash to your computer's Network services settings from Control Panel and choose iPhone. Alternatively, Mac users (must be running Mac OS X 10.5.7 or later), you would see a quick pop-up on your screen with the message "A new network interface has been detected". left click on Network Preferences, then enter configuration settings of your network provider for iPhone, then click on Apply to save settings.

  • Alternatively

    1. Connect wireless via Bluetooth
      Still in the same manner, head over to your iPhone's settings menu, tap General > and switch on Bluetooth connection. But you must first pair and connect the iPhone to your computer.
    2. Browse the Web
      Now you will see that the Bluetooth Icon now carries the message "Internet Tethering" at the top of your iPhone. Now you are good to go 'cus you just succeeded in connecting your iPhone as a Modem.
    3. But Wait !!!

      Not so Fast, Do get a data plan of your choice to surf with and remember not to turn of Internet tethering until you are done with your browsing section on Ensure you have a large data quota to work with, as tethering uses much more data than browsing the Web on your iPhone does. If you regularly use tethering, we suggest a data allowance of at least 1GB per month.

    Tuesday, April 23, 2013

    GREAT WAYS TO CHANGE YOUR IP ADDRESS WITH FIRE FOX EXTENSION

    If you are really looking out for ways to surf websites and blog that restrict your location and IP address, then just make your self comfortable reading the below tutorial and stay anonymous.

    You can bet with me that there is no website or blog you can possibliy visit without leaving a trace of your location, computer and browser infomation. Some of these websites place ban on users and visitors from specific location and network,there by making it imposible for you to access them if at all you fall within that location. Some locations also have been flaged due to large number of spam activity that originates from such location. I am sure you already know what I am talking about. It means IP addresses from such locations have been black listed. Most at times IP address from Nigeria and other West african countries are flaged in major websites arround the world.

    Any way I just broke the ice and dicovered a better way of bypassing such restriction to enable you access such websites without any software. You can use it to get yourself a paypal, clickbank, and join other social Networking site such as zoosk.com, facebook, twoo.com, badoo and many others. Just follow my simple tutorial and you're done (staying anonymous).

    Your first step to an unrestricted Internet access is to download this Firefox Extension that helps you to grab hundreds ( over+300) of web proxies built into Firefox

    HOW Important is this Firefox Extension?
    Now let me tell you something unique about this "Firefox Extention" or whatever
    1. › You get hundreds of web proxies built into Firefox!
    2. › Choose among hundreds of live proxies (304 proxies live) to manage your web identity:
    3. › Find the fastest connection available by latency
    4. › You can Switch to new proxies right in your web browser if you want and avails you an unparalleled proxied browsing experience for FREE
    what you can use the IP addresses for
        › Browse the web anonymously using our shared, public IP addresses
        › Change your location geographically withdiverse servers to choose from
        › Secure your browsing history with a high URL encryption scheme
        › Start fresh with a new IP any time


      STEP 1
      Dowload and Install it,
      Go to your firefox browser menu bar and select Tools to find where to active the Proxy extention.
      I strongly recommend that you sort for proxy list that gat high latency so that the fastest ones such as those shown in green ensures maximum result, experiment with the yellowish ones until you find a nice proxy with a e.g., minimal or no ads and less pop ups that you can use. You can save your favourite proxy with a star for easy access.

      STEP 2


      Quickly Make your like a kid who just found himself in a burger shop with Daddy and select any proxy to browse the hell outta your PC:
      type URLS browsingcheat.blog spot.com, click links, open bookmarks like normal. You dont need to freak out, Sure! the extension got you covered and your browsing is proxied. You have the freedom to switch proxies (or turn it off) at any time through the proxy list menu using step 1

      THAT's ALL

      Thursday, April 18, 2013

      How To Create and Customized Blackberry Themes

      Let me quickly put you through all you need to know in customizing a Blackberry theme for your mobile and the steps in installing The Plazmic 4.6 Theme Builder For your Blackberry. To get Start Find The Theme Builder Tool Software needed for this tutorial below:
        Plazmic Theme Builder or HERE (alt. Link).

      Hey,

      You don't need to be a mobile app developer or a genius in other to create a nice looking amazing theme for your blackberry. What am about to show you is what I have always used in creating and customizing prety cool Blackberry themes for my mobile. I've also used same for uploading tons of customized blackberry themes for mobile downloads.Plazmic Theme Creator is available for free download so you dont have to pay a dime.

      The install instructions?

      Huh! well i dont think that should bother you. I have taken few seconds to expain all that below. All you have to do is stick tothem and you'll be cranking and churning out themes like there is no tomorrow.

      But wait!

      You must installed the following in order for the Plazmic installation to work perfectly.
      As you can see, I've provided several links contain several versions of the software. All you gat do is to install the version most preferable by the Installer, which in some cases is not the most current version.

      1. jdk-1_5_0_15-nb-6_1- windows.exe
      Download the jdk from here
      This file is 90.6mb and contains the following:
      jdk-1_5_0_15-nb-6_1-windows
      GenuineCheck
      GenuineCheck-1

      2. BlackBerry_JDE_4.2.0.exe
      Download the JDE from here
      This file is 80.3mb.

      3. BlackBerry_Email_MDS_4.1.0- 4.exe
      Download the Email MDS from here
      This file is 79.8mb and contains:
      BlackBerry_Email_MDS_4.1.0-4
      BlackBerry_Email_MDS_4.1.4

      4a. Plazmic_CDK_v4_2_2.exe for OS 4.2+
      Download the Plazmic Installer 4.2 from here
      This file is 122mb and contains:
      Plazmic_CDK_v4_1
      Plazmic_CDK_v4_2_2

      or

      4b. Plazmic CDK v4.5 for OS 4.5+
      Download the new Plazmic Theme Builder 4.5 here!

      NOTE:
      Themes built using CDK 4.2 will work on all OS's from OS 4.2 up. Themes built using CDK 4.5 will not work on OS's prior to OS 4.5 unless you follow the instructions below.

      Please feel free to ask any question or forward problems using the comment box below:

      Here is how to Modify Plazmic ThemeBuilder 4.5 to Export Custom Themes in OS 4.2.2

      you need to edit some files..but its REAL easy. Do it at your OWN RISK….

      1) make sure Themebuilder is CLOSED (Alt+ F4)

      2) locate the Plazmic CDK 4.5 in your Program files directory. (e.g C:\\Users\program_files\Pla ****\....

      3) go to the directory RESOURCES

      4) select the file THEMES

      5) look for 2 folders. 1 is dimension240×260, the other dimension 320×240.

      6) within the dimension 240×260 there is a file called 8100Custom. Open with Wordpad or Notepad.

      7) Edit the following lines to look like this:
      The files are found in the Resource/Theme directories, then the 240×260 directory (will have the 8100 files) the 320×240 (will have the 8300, 8800 files) I’d suggest not changing the 7100 or 8700 (is there an os 4.5 for 8700?) files:

      these are the lines you edit:

      theme.supportedHandheldOs = 4.2.2,4.5
      theme.preferredHandheldOs = 4.5
      theme.importOs = 4.2.2,4.3.1

      Go to the dimension320×240 file and do the same for the 8300Custom, 8800Custom.

      I don’t think you will find it necessary to edit the 7100 or the 8700 (are the 8700’s going to be using OS 4.5?)

      HOPE IT WORKS FINE!

      Wednesday, February 20, 2013

      SECRET CODES TO HACK A BLACKBERRY PHONE

      The following BlackBerry secrets will help you get started and improve your efficiency if you're new to the BlackBerry world.
      Using BlackBerry phones has become a way of life for ordinary individuals, small business people as well as corporate tycoons. If you own a BlackBerry device and use it for daily work, you very well understand that even small BlackBerry secret tips can considerably increase your efficiency while using this valuable device. So, here are a few BlackBerry secrets to get you started. You can obtain lots of information by entering secret codes on your BlackBerry device. Compose a new email in your BlackBerry device and enter one of the following secret codes in the text field and press space to get the following information. Secret Code: mynumber Typing this code into an email or text will automatically display your cell phone number in your message. This is particularly helpful when you have more than one BlackBerry device that you use on regular basis. Secret Code: myver Typing this code into an email or text exhibits your device’s software version and its model number. Secret Code: LD Typing this code into an email or text exhibits the local date. Secret Code: LT Typing this code into an email or text exhibits the local time. Secret Code: mysig Typing this code into an email or text returns the information you entered in the BlackBerry Options, Owner screen tab. Secret Code: mypin Typing this code into an email or text exhibits your BlackBerry device’s PIN. Text Messaging Trick All touchscreen BlackBerry devices have a feature that filters text messages. If you want to look at all the notes from a particular sender, simply hold your finger over a message sent by that person. Within a few seconds, your phone will start scanning your text messages and show only the notes that were sent from and to that particular person. Rebooting BlackBerry Rebooting your BlackBerry was never as easy. Simply press Alt, Right Shift, and Delete together. Your BlackBerry will start rebooting like you have just inserted the battery. Switch Applications While using the BlackBerry, if you want to switch to another application, hold Alt and press Power or Escape. Then continue to hold Alt and choose the application that you desire to switch to. Release Alt to finally enter the chosen application. Insert Period The most common way to insert a period on a BlackBerry is to press Alt and the M key. But, according to another BlackBerry secret, pressing the space key twice will also add a period. Capitalization You can capitalize letters in a BlackBerry in the following two ways. Either press Shift and then the letter that you wish to capitalize or simply hold the letter that you wish to capitalize for a few seconds. Quick Scrolling If you quickly want to scroll through multiple pages of text on a BlackBerry then while viewing the text, press Space to scroll down the page and hold Shift and press Space to scroll up the page. Keyboard Codes You’ll need to enter the following codes while you are on the Home screen. Code: A or C Information Returned: Phonebook Code: S Information Returned: Search Code: F Information Returned: Phone profiles Code: W or B Information Returned: Browser Code: H Information Returned: Help Code: K Information Returned: Locks the keys Code: L Information Returned: Calendar Code: V Information Returned: Messages Code: M Information Returned: Messages folder Code: R Information Returned: Alarm Code: T Information Returned: Tasks Code: U Information Returned: Calculator Code: I Information Returned: Applications Code: O Information Returned: Options Code: P Information Returned: Phone Browser Codes You’ll need to enter the following codes while you are in the browser. Press T to go to the top of page. Press B to go to the bottom of page. Press Space for page down. Press U to switch between hide/unhide in title bar.

      Friday, February 3, 2012

      Reset Your Forgotten Windows Password

      Its happen with all of us, we are in hurry and we mix our windows password with other one or we forgot
      windows password. And most people format computer if they forgot there login password. but here is the way to reset your password ...


      you just need bootable CD/DVD of your windows

      Windows XP
      1 ) Place your Windows XP bootable CD in your cd drive and re-start your system
      2 ) Keep eyes on screen when you see booting message "Press any key to boot from cd", Press "Enter"
      3 ) Setup will start Loading system and other files, wait till you have "Welcome to Setup" screen
      4 ) Press enter to start setup, on "Licensing Agreement" Press "F8" to accept it and continue
      5 ) Now you will get "Setup" screen, here you will see Repair and Install Windows option, press "R" to select repair option
      you will see something like this on screen, “If one of the following Windows XP installations is damaged, Setup can try to repair it”
      6 ) Wait and all Repair run, its check your disks and then start copying files for several minutes
      7 ) Setup will be required to Reboot/Restart, your system will reboot it's self
      8 ) While reboot don't press any key, till "Installing Windows" screen open

      Click here to Read more »

      Monday, December 12, 2011

      Be careful if you are useing Cafe or Public computer.

      Normally when you enter a username and password... Firefox will ask if you want Firefox to remember them, with "Remember", "Naver for This Site" and "Not Now" options. but hacker found a some trick by adding a small script there, if you are useing any public computer at office or cafe or any other place be careful if firefox on that computer hacked, its save your Username and Password silently without your permission even you click on "Naver for This Site" or "Not Now"।so if you are useing firefox on public computer just check if your Username and Password auto saved or not before left that computer.

      Check and Delete if Username and Password if auto saved:

       
      1 ) In Firefox open "Tools" menu and click on "Options".
      2 ) Click the "Security Icon" from toolbar.
      3 ) Click "Saved Passwords..." button, and the Password Manager will open.
      4 ) You can see Particular website name and Username list there.
      5 ) To be extra sure it's your id, Click on "Show Password" button.
      5 ) If your ID and Password there in list, select them by click on it.
      6 ) Click on "Remove" buttion to delete them.


      Blog Copyright 2011-2012 Rushi Pandya(INDIA)
      http://pandyarushi.blogspot.com/

      Saturday, March 27, 2010

      HOW TO MOD OR COSTUMIZE OPERA MINI FOR URSELF


      Hey Guyz,
      just a little digression to bring you
      HOW TO MOD OR COSTUMIZE OPERA MINI FOR URSELF

      all you have to do is to follow these simple steps
      having said that now lets go there! or rather
      come with me guys

      REQUIREMENTS
      OperaMini 4.2 UNmodifed please download
      directly from opera website
      HxD hex editor(this i know u already ve from my
      other thread on cracking java)
      WinRAR for extracting a.class, f.class and v file
      Computer(most important of all)
      pngout.exe program
      Paint
      Pixelformer
      Splash image in .png format(as time progresses i
      will let us know how to do this)
      Scientific Calculator (u can simply use the one in
      ur system cos that is what i used through out)
      Kemulator( for testing ur work as u progress
      please use without internet connection)

      Topic 1. Embedding the Skin on v file
      1. Open v file and the skin (pic u want to use
      in .png) file in HxD hex editor.
      2. Highlight all the contents of the skin file and
      copy it. You may press Ctrl A then Ctrl C. Take
      note of the value in Lenght indicator. This is the
      filesize of skin in hexadecimal.
      3. Goto the v file tab and press Ctrl F. Search for
      "png" text string.
      4. Highlight the bytes starting from 89 50 4E 47
      0D 0A 1A or the address 00001DA0 x 0E until the
      Lenght indicator reaches C7C.
      5. Press Ctrl V to embed the skin image on v file.
      Now we're ready to change those addresses
      embedded in the v file. Change only the
      addresses enclosed with the blue boxes.
      These addresses are for unmodded v file and
      often times changes if modifications were already
      done on the v file.
      6. Open the scientific calculator and put it in hex
      mode. If the filesize of the skin in hex is greater
      than C7C then subtract C7C from the filesize of
      the skin. If the filesize of the skin is less than C7C
      then subtract the filesize of the skin from C7C.
      Take note of the the answer.
      Add the answer in procedure 6 to the address
      enclosed in a box in procedure 5. Change
      them accordingly to the result of adding or
      subtracting those embedded addresses
      7. Save v file and exit HxD hex editor.
      8. Open operamini 4.2 with WinRAR and drag the
      v file from the desktop to operamini...jar.
      9. Click Ok and close WinRAR.
      10. Finally, install your modified Operamini...jar
      on your phone or use microemulator on your
      computer to test your work.

      Topic 2. Changing the Welcome Page
      1: First, we need a webpage address. For this
      guide I will be using the address "http://
      www.mozilla.com/en-US/firefox/firefox.html" as
      my welcome page.
      2. Open v file with HxD editor. Click the Edit menu
      then click on Replace. At the Search for box, type-
      in "http://www.operamini.com/firsttime/4.2/"
      and at the Replace with box, type-in the URL of
      your welcome screen. Click OK.
      3. Highlight all the text that are red color and
      takenote of the Lenght value. In the screenshot I
      got a 31 hex.
      4. Change the hex value of the character just
      before "http" to the of length in procedure 3.
      5. Now where done with editing the URL of the
      welcome screen. The next thing to do is to
      change the embedded addresses on the v file. If
      the length value obtained in procedure 3 is equal
      to 27 hex, then proceed to the next procedure. If
      the length value obtained in procedure 3 is greater
      than 27 hex, then subtract 27 hex from the length
      and add the answer to each of the boxed
      addresses. If the length value obtained in
      procedure 3 is less than 27 hex, then subtract it
      from 27 hex and subtract the answer to each of
      the boxed addresses.
      6. Save v file and exit HxD.
      7. Test your mod.

      Topic 3. Editing the server of OperaMini 4.2
      1. Open HxDSetupEN.zip and double click
      Setup.exe to install HxD hex editor.
      2. Open operamini...jar with WinRAR and drag
      the a.class file into the desktop. Minimize WinRAR
      and don't close it.
      3. Double click HxD icon to launch the hex editor
      and open a.class file in it.
      4. After opening a.class, click the Search menu
      and then click Replace.
      5. Type-in the "http://
      server4.operamini.com:80/" in the Search for text
      box and the server that you want in the Replace
      with: text box. Then, click OK.
      6. Highlight the text that are red in color and take
      note of the value of Length: at the bottom.
      In my screenshot, the Length is equal to 29.
      7. Highlight the character before "http".. and goto
      Edit menu then click Fill Selection...
      8. Type-in the Hex-values text box the value of
      the Length in procedure 6 and click OK.
      9. Save the changes you made in a.class and
      close HxD.
      10. Drag a.class back to WinRAR and click OK to
      save your work.
      11. Finally, close WinRAR and install your modified
      Operamini...jar on your phone or use your
      emulator to test.

      Topic 4. Changing the Startup Loading Bar and
      Background Color

      1. Open pixelformer and choose a color you want
      for the loading bar and background. Take note of
      its hex value.
      2. Open f.class with HxD hex editor.
      3. Find and replace the hex values AC 16 14 and FF
      FF FF with any hex color you want. AC 16 14 for
      loading bar and FF FF FF for the background
      color.
      4. Save f.class and drag it back to operamini.
      5. Test your work on your phone or emulator

      Wednesday, June 10, 2009

      PC CONNECTION FOR MTN USERS


      PC CONNECTION WITH MOBILE

      1. Just install NOKIA PC SUITE into your PC. After doing that , or if you already have it no need of installing another (mean while a better version of NOKIA PC SUITE is preferable)
      2. go to your desktop or where ever you must have installed it and double click on the NOKIA PC SUITE icon in a quick succession
      3. when it opens click on ‘get connected’ button below and connection wizard will open
      4. click ‘NEXT’
      5. Select connection mode you want ( either USB, infra red or Bluetooth ) and click ‘ NEXT’
      6. connection will start immediately via the selected connection mode
      7. That’s not all yet, after that, the phone modem you are using appears then click ‘FINISH’

      1. GO BACK TO THE NOKIA PC SUITE WINDOW
      2. select ‘connect to internet’ ( ONE TOUCH ACCESS)
      3. click on ‘settings’, the phone modem you selected will appear and you will select it and click on ‘NEXT’
      4. Select network from a list and locate MTN NIGERIA Nigeria in the list.
      5. Then click ‘FINISH’
      6. You can go back to the connect to internet icon on the NOKIA PC SUITE and click on ‘CONNECT’ button to start your connection ( PLS DO NOT CLOSE THIS WINDOW OR YOU MAY LOOSE CONNECTON ) If you follow this steps very well connection will start automatically
      7. As soon as connection is establish your computer will tell you for example Nokia 5200 USB modem 460.8kbps connected…

      GO TO THE START MENU OF YOUR PC

      1. find ‘CONNECT TO’ option and click on it

      2. you will find your Nokia phone modem e.g. NOKA 5200 USB MODEM (OTA) If you cant find it , it means you have not followed this steps successfully.

      3. If you found it, place your mouse pointer on it and RIGHT click on it to select ‘CONNECT’

      4. Immediately a connection dialogue box appears. just enter password & username and click on dial

      PASSWORD = Web

      USERNAME = Web

      GO AND OPEN YOUR INTERNET EXPLORER AND START BROWSING

      N/B THERE MUST BE MONEY IN YOUR ACCOUNT BALANCE

      YOUR PHONE MUST BE CONFIGURED BEFORE YOU CAN START BROWSING … IF DON’T HAVE THE MANUAL CONFIGURATION ON YOUR PHONE JUST GO TO MY BLOG http://browsingcheat.blogspot.com or still yet click here to email me NOW.

      IF YOU WANT THE FREE BROWSING THANKS

      NOTE THAT YOU WILL BE NEEDING SOME SOFTWARES SUCH AS OPENVPN

      YOUR FREEDOM

      FIRE FOX

      NOKIA PC SUITE